Paths
An infrequently asked question from Luxor users is “How can I extract the paths from an SVG file?”. I’ll try to answer it here.
Easy SVG
Luxor.jl lets you add SVG and PNG images to the current drawing. First you load the image with readsvg(), then you place it with placeimage():
# using Luxor, Colors
# @draw begin
img = readsvg("""<svg
xmlns="http://www.w3.org/2000/svg"
viewBox="0 0 512 512">
<rect width="512" height="512" rx="15%" fill="#fff"/>
<circle fill="#389826" cx="256" cy="137" r="83"/>
<circle fill="#cb3c33" cx="145" cy="329" r="83"/>
<circle fill="#9558b2" cx="367" cy="329" r="83"/>
</svg>
""")
placeimage(img, centered=true)
# end
Don’t worry - in practice I think it’s more usual to supply the path name of an SVG file on disk, rather than the raw SVG code.
I found this SVG image on freesvg.org, a site that has strong “1990s clip-art” vibes. It’s Tribal-Kitten.svg:
using Luxor, Colors
img = readsvg("_assets/images/path/Tribal-Kitten.svg")
w, h = img.width, img.height
Drawing(w, h, joinpath(@OUTPUT, "image2.svg"))
origin()
placeimage(img, centered=true)
finish()
Cat boxes
While placing SVG images is easy, you can't do much with them apart from that. You can place them using the current position, scale, and rotation:
img = readsvg("_assets/images/path/Tribal-Kitten.svg")
w, h = img.width, img.height

tiles = Tiler(w, h, 5, 5)
for (pos, n) in tiles
    @layer begin
        box(tiles, n, :clip)
        sethue(HSB(rand(0:360), .4, .8))
        paint()
        clipreset()
        translate(pos)
        scale(0.1 + rand()/10)
        rotate(rand() * 2pi)
        placeimage(img, O, centered=true)
    end
end
but that's about it. It’s acting more or less like a PNG image - you can’t change the colors or opacity, and you can’t peek inside to access the coordinates of the paths without cracking open a text editor.
The SVG import feature in Luxor.jl is provided by the librsvg library, via the Rsvg.jl package. This library is good - it translates the SVG file’s contents from XML and converts these directly into Cairo functions and evaluates them. It’s not perfect. Parsing SVG files with 100% accuracy isn't librsvg's thing - it's only reasonably accurate. According to these results it scores about 70%, somewhere between Safari and Inkscape.
And, even if the SVG makes it through librsvg intact, you can’t access the coordinate data inside it anyway. Hence the question.
There is, though, a kind of workround, using some of the less often used features of Luxor. It might not be perfect, but it might help in some situations. There are a few steps:
convert to an EPS file
place the EPS file on the Luxor drawing
copy the functions from the REPL/log, or
add a Dispatcher to collect the paths
St-eps
First, convert the SVG image to EPS. EPS is "Encapsulated PostScript Format", an older sibling of the PDF and SVG file specifications, made by Adobe in the 1990s as a slightly constained version of PostScript, and it became the standard way of transporting vector data from program to program. These days it's been largely superseded by PDF and SVG, but Luxor (thanks to Cairo) can export drawings as EPS files:
img = readsvg("_assets/images/path/Tribal-Kitten.svg")
@eps placeimage(img, centered=true) w h "_assets/images/path/tribal-kitten.eps"
The second step is to place this EPS file on a new drawing, using the highly experimental placeeps() function:
using Luxor, Colors

img = readsvg("_assets/images/path/Tribal-Kitten.svg")
w, h = img.width, img.height
@eps placeimage(img, centered=true) w h "_assets/images/path/tribal-kitten.eps"
Drawing(w, h, joinpath(@OUTPUT, "image4.svg"))
origin()
translate(boxtopleft())
placeeps("_assets/images/path/tribal-kitten.eps")
finish()
This code reads the SVG file, exports it to an EPS file, places the EPS file on a new drawing, then saved the result back into a SVG file. Like a cat chasing its tail...
But now, use a keyword for placeeps() - the log keyword. Set this to true, and run the code again:
placeeps("_assets/images/path/tribal-kitten.eps", log = true)and some Julia code is sent to the REPL:
# start EPS import
gsave()
gsave()
setgray(1.0)
# rect(Point(0.0, 0.0), 1446.0, 1622.0, action=:stroke)
setgray(0.0)
move(Point(931.492, 1591.379))
curve(Point(835.254, 1519.324), Point(726.898, 1475.922), Point(611.664, 1447.504))
curve(Point(664.988, 1434.969), Point(717.906, 1436.594), Point(770.637, 1449.609))
curve(Point(823.273, 1462.602), Point(871.434, 1485.355), Point(915.457, 1517.121))
...
grestore(); clipreset()
# end EPS import
It's about 700 lines of Luxor code, the functions that draw the various paths in the EPS image. Now you can paste that into your own code and the graphics are ready to re-use.
Well, this works, but scrolling through the REPL like this might be a bit tedious. You could always divert the output into a file:
redirect_stdio(stdout = "/tmp/tribal-kitten-image.jl") do
    placeeps("_assets/images/path/tribal-kitten.eps", log = true)
end
and then copy it elsewhere, but that still feels like hard work.
Dispatches
A solution to this lies in the Luxor Dispatcher feature.
When you place marks on the drawing (with fill, stroke, and so on), the drawing functions are sent to the current Dispatcher which in turn calls the default Luxor functions. So, by default, any fill operation calls the Dispatcher, which calls the Luxor.fillpath() function, which calls the Cairo.fill() function, which fills the path.
This indirection is designed so that you can intercept the drawing functions and replace them with your own. You can create your own Dispatcher and your own fill and stroke functions, and these replace the default actions.
Here’s a simple example that adds a “let’s print the color of each path to the REPL” feature to the fill and stroke operations:
struct MyDispatcher <: Luxor.LDispatcher end

function Luxor.fillpath(::MyDispatcher)
    @info "filling with: " getcolor()
    return Luxor.fillpath(Luxor.DefaultLuxor())
end

function Luxor.strokepath(::MyDispatcher)
    @info "stroking with: " getcolor()
    return Luxor.strokepath(Luxor.DefaultLuxor())
end

Luxor.DISPATCHER[1] = MyDispatcher() # there's only 1
Now the REPL will be filled with color information whenever you draw any graphics:
julia-1.9> @draw julialogo()
┌ Info: filling with
└   getcolor() = RGBA{Float64}(0.0,0.0,0.0,1.0)
┌ Info: filling with
└   getcolor() = RGBA{Float64}(0.251,0.388,0.847,1.0)
┌ Info: filling with
└   getcolor() = RGBA{Float64}(0.22,0.596,0.149,1.0)
┌ Info: filling with
└   getcolor() = RGBA{Float64}(0.584,0.345,0.698,1.0)
┌ Info: filling
└   getcolor() = RGBA{Float64}(0.796,0.235,0.2,1.0)
julia-1.9>
The colors in the Julia logo are ddisplayed in the REPL.
When you've finished, remember to switch back to the default Dispatcher:
Luxor.DISPATCHER[1] = Luxor.DefaultLuxor()Let's apply this technique to the kitten SVG:
using Luxor, Colors
struct FillDispatcher <: Luxor.LDispatcher end

paths = Path[]
colors = Colorant[]

function Luxor.fillpath(::FillDispatcher)
    push!(paths, storepath())
    sethue(HSB(rand(0:360), 0.8, 0.9))
    push!(colors, getcolor())
    return Luxor.fillpath(Luxor.DefaultLuxor())
end

img = readsvg("_assets/images/path/Tribal-Kitten.svg")
w, h = img.width, img.height
Drawing(w, h, joinpath(@OUTPUT, "image5.svg"))
origin()
background("grey10")
translate(boxtopleft())
# switch to the new Dispatcher
Luxor.DISPATCHER[1] = FillDispatcher()
placeeps("_assets/images/path/tribal-kitten.eps")
# switch back to the default Dispatcher
Luxor.DISPATCHER[1] = Luxor.DefaultLuxor()
finish()
As well as drawing the psychedelic kitten, this code stores each path and color used - each path goes into the paths array, and each color in the colors array. It’s now possible to access the paths and colors again, sequentially or in parallel.
If we flatten the paths array of multiple paths into a single path, it’s easy to iterate over it. Here’s a simple animation using drawpath(), using mainly the drawpath() function:
function frame(scene, framenumber)
    translate(boxtopleft())
    eased_n = scene.easingfunction(framenumber, 0, 1, scene.framerange.stop)
    background("black")
    sethue("white")
    pt = drawpath(allpaths, eased_n, action=:stroke)
    sethue("red")
    circle(pt, 5, :fill)
end

function make_the_kitten_move()
    amovie = Movie(w, h, "kitten")
    animate(amovie,
        Scene(amovie, frame, 1:120),
        framerate=10,
        creategif=true,
        pathname="_assets/images/path/tribal-kitten.gif")
end

allpaths = Path(Iterators.flatten(map(i -> i, paths)) |> collect)

make_the_kitten_move()
drawpath() accepts a path and a number between 0 and 1: the start of the path is 0, the end is 1, and a number in between is a fraction of the path. So a value of 0.5 draws the first half of the path. eased_n converts the incoming framenumber into values from 0 to 1. The animation is as smooth as the number of frames required, here 120. In this image, there aren’t any straight lines, it’s all Bézier curves, but both straight lines and Bézier curves are “sampled” as required.
When it’s just a single path with multiple loops (subpaths), as here, it’s not possible to change the colors for each loop. It’s “one path - one fill color - one stroke color”. But iterating through the paths and colors arrays is possible:
function frame(scene, framenumber)
    translate(boxtopleft())
    eased_n = scene.easingfunction(framenumber, 0, 1, scene.framerange.stop - 5)
    background("black")
    for (n, path) in enumerate(paths)
        sethue(colors[n])
        pt = drawpath(path, eased_n, action=:stroke)
        sethue("red")
        circle(pt, 5, :fill)
    end
end

function make_the_kitten_move_again()
    amovie = Movie(w, h, "kitten")
    animate(amovie,
        Scene(amovie, frame, 1:60),
        framerate=10,
        creategif=true,
        pathname="_assets/images/path/tribal-kitten-1.gif")
end

make_the_kitten_move_again()
The kitten is drawn by - and drawn to? - the lights of dozens of laser pointers...
Travel plans
If you use Pluto.jl and “walk along” the single path, using a Slider, you’ll notice that you’ll jump from one subpath to the next, and they’re in no particular order.

This is probably fairly typical of many SVG illustrations, where non-overlapping paths on a single layer can be drawn in any order.
You could always sort the paths:
sort!(paths, lt = (p1, p2) -> begin
if first(p1) isa PathMove && first(p2) isa PathMove
d1 = distance(bx, first(p1).pt1)
d2 = distance(bx, first(p2).pt1)
d1 < d2
end
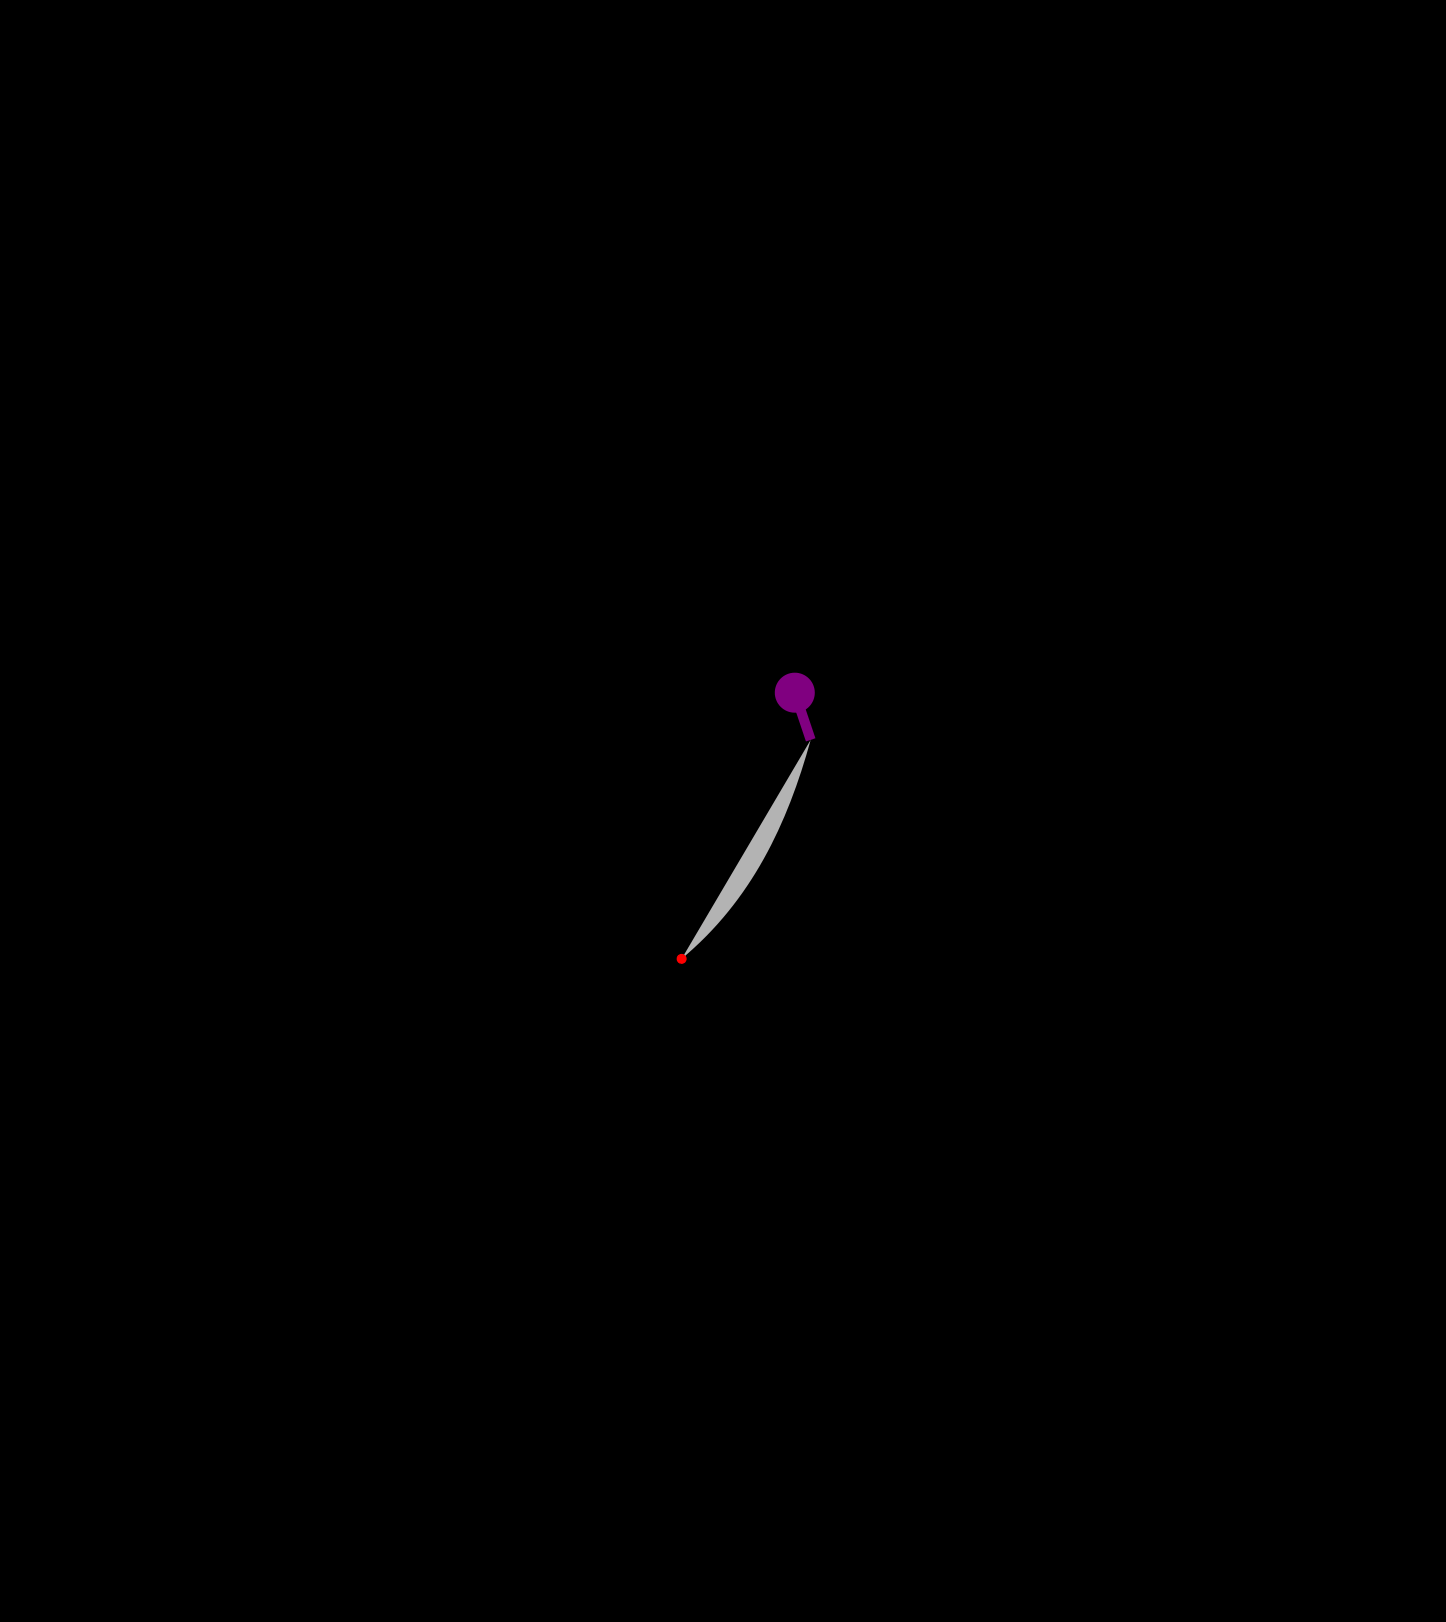
end)But if controlling the order in which the subpaths are drawn is important to you, you could use something like Evan Field’s excellent TravelingSalesmanHeuristics.jl package. This provides functions that can take a list of points and provide a good solution to the well-known problem of finding an efficient, “low cost”, route that visits every location, like a cat with a routine. You provide a distance matrix dm of points and distances, and then use solve_tsp(dm) to obtain a solution.
In the result (left) the purple path shows one solution to such a “Traveling Sales Kitten” problem, and this route has shorter jumps between the start locations of each subpath. In the earlier version (right), the paths are drawn in some random order:
The use of the fillpath() instead of strokepath() makes for an interesting effect.
We could go further and try to find the shortest route including the paths themselves... But this kitten wants to go to sleep now.
@svg begin
    background(0.1, 0.05, 0.3)
    # starry night
    @layer begin
        setopacity(0.5)
        sethue("white")
        for i in 1:200
            star(rand(BoundingBox()), rand(1:3), 5, .7, 0, :fill)
        end
    end
    # sleepy kitten
    @layer begin
        translate(boxtopleft() + (200, 0))
        placeeps("_assets/images/path/sleepingkitten.eps")
    end
    # box
    sethue(0.1, 0.1, 0.2)
    box(Point(-200, 0), Point(200, 400), :fill)
    # julia logo
    @layer begin
        translate(0, 200)
        juliacircles(60)
    end
    setopacity(0.7)
    box(Point(-200, 0), Point(200, 400), :fill)
end 800 700 "_assets/images/path/sleepingkitten.svg"
[2023-09-22]
