Depth
The other day I found myself idly staring at a Pluto notebook, wondering about the logo and how it would move when animated.
using Luxor
function plutodots(radius=50; outercircleratio=0.75, innercircleratio=0.65)
    old_color_sequence_dark = [
            Luxor.darker_red,  Luxor.darker_purple, Luxor.darker_green]
    old_color_sequence_light = [
        Luxor.lighter_red,  Luxor.lighter_purple, Luxor.lighter_green]
    new_color_sequence = [
        Luxor.julia_red,  Luxor.julia_purple, Luxor.julia_green]
    points = between.(O + (0, radius), O - (0, radius), range(0, 1, length=3))
    setline(radius/10)
    @layer begin
        for (n, p) in enumerate(points)
            setcolor(old_color_sequence_light[n]...)
            circle(p, outercircleratio * radius, :fill)
            setcolor(old_color_sequence_dark[n]...)
            circle(p, outercircleratio * radius, :stroke)
        end
    end
    return points
end
@svg begin
    plutodots()
end 600 300 "_assets/images/depth/pluto.svg"
Pluto.jl is the amazing new reactive notebook system for Julia programming.
I think the first thing I'd noticed about the logo was that it was using the old Julia colors - the two-tone light and dark sequence that was part of the original logo and that lasted all the way to Julia version 1.1 (May 2019). The rings were originally lighter and edged in a darker color, but after version 1.1 the logo took on a simpler, bolder look. Here's how the Julia application icons as seen on my MacOS have changed:
![]()
Not many things in the computer world get simpler over time, but icons and logos often do: they evolve to become stronger, simpler, and more direct, as unnecessary details are discarded. Simpler designs also prove to be easier to draw and print on t-shirts or lorries.
The developers of Pluto.jl are meticulous about many details, so they may well have chosen the edged disks deliberately because they made a clearer image. If they'd used the newer colours, they would have got something like this:
function moreplutodots(radius=50; outercircleratio=0.75, innercircleratio=0.65)
    new_color_sequence = [ Luxor.julia_red,  Luxor.julia_purple, Luxor.julia_green]
    points = between.(O + (0, radius), O - (0, radius), range(0, 1, length=3))
    setline(radius/10)
    @layer begin
        for (n, p) in enumerate(points)
            setcolor(new_color_sequence[n]...)
            circle(p, outercircleratio * radius, :fill)
        end
    end
    return points
end
@svg begin
    moreplutodots()
end 600 300 "_assets/images/depth/morepluto.svg"
and that's not an improvement - the colors are now clashing with each other too much. Perhaps with a white "atmosphere" around each one?
function moreplutodots1(radius=50; outercircleratio=0.75, innercircleratio=0.65)
    new_color_sequence = [ Luxor.julia_red,  Luxor.julia_purple, Luxor.julia_green]
   points = between.(O + (0, radius), O - (0, radius), range(0, 1, length=3))
    setline(radius/10)
    @layer begin
        for (n, p) in enumerate(points)
            setcolor(new_color_sequence[n]...)
            circle(p, outercircleratio * radius, :fill)
            sethue("white")
            circle(p, outercircleratio * radius, :stroke)
        end
    end
    return points
end
@svg begin
    moreplutodots1()
end 600 300 "_assets/images/depth/morepluto1.svg"
nah - this also looks a bit odd. Anyway, I'm happy to leave this task to the developers, who know what they want.
Instead, I go back to wondering how it would move. It feels like it wants to jump into the third dimension and move, somehow. So I thought it would be worth digging out an old package I'd made a few years ago that makes 3D vector graphics: Thebes.jl. It was covered in digital dust, but it's now been updated to Julia 1.0. It's a little toy package that has occasionally justified its existence.
Thebes.jl
Thebes.jl is a very simple package that feeds Luxor.jl with 2D projections of 3D wireframe coordinates. The 3D world of Thebes and the 2D world of Luxor coexist happily:
using Thebes, Luxor
@svg begin
    axes3D() ## Thebes
    rulers() ## Luxor
end 600 300 "_assets/images/depth/the_realm.svg"
(The modern city of Luxor is built on the remains of the ancient Egyptian capital city of Thebes, hence the name.)
The two main things to know in Thebes.jl are:
the
Point3Dtypethe
pin()function
For example, say you want to draw a pentagon. You use Luxor's ngon() function, convert the points to 3D with convert(), which adds a z-ccordinate of 0.0, and then, when you're ready to finally draw them, use pin() to convert them back to 2D and place them on the current Luxor drawing.
@svg begin
    axes3D()
    pentagon = convert.(Point3D, ngon(O, 150, 5, 0, vertices=true))
    pin(pentagon)
end 600 400 "_assets/images/depth/pentagon.svg"
The name pin() could be an acronym for "project it now!", but it was originally based on the idea of pinning 3D things onto a flat board. And the word is very short and doesn't clash with common words like draw and plot and paint from other packages. There's a pin() function in Pkg.jl, but I don't think it's exported from there.
@svg begin
    htroch = convert.(Point3D, hypotrochoid(150, 27, 41, vertices=true))
    pin(htroch)
    axes3D(50)
end 600 300 "_assets/images/depth/htroch.svg"
Our brains spend a lot of time creating believable 3D worlds out of images displayed on flat surfaces such as phones, computers, and televisions, so it's not surprising that a few suggestive graphical shapes can produce a convincing 3D scene. The brain can't help but make them exist in 3D space, even though they're just 2D lines and polygons.
In this next example, it's even slightly disappointing that the 2D shapes aren't really intersecting each other. But they're just coloured shapes...
Here, the gfunction() is the graphic action that's applied to the argument of pin().
gfunction(p3, p2) = poly(p2, close=true, :fill)

function main()
    @svg begin
        axes3D(200)
        setopacity(0.5)
        eyepoint(200, 200, 200)
        perspective(200)
        plane = convert.(Point3D, box(O, 250, 300, vertices=true))

        sethue("green")
        pin(plane, gfunction=gfunction)

        rotateby!(plane, π/2, 0, 0)
        sethue("red")
        pin(plane, gfunction=gfunction)

        rotateby!(plane, 0, π/2, π/2)
        sethue("blue")
        pin(plane, gfunction=gfunction)
    end 600 400 "_assets/images/depth/planes.svg"
end

main()
Since I've not yet worked out how to draw Bézier paths in 3D, the best way to draw a circle at the moment is to make a many-sided polygon.
function disks()
    helloworld() # reset to default view
    @svg begin
        sethue("grey40")
        carpet(200)
        d1 = convert.(Point3D, ngon(O, 50, 80, 0, vertices=true))
        d2 = convert.(Point3D, ngon(O, 50, 80, 0, vertices=true))
        d3 = convert.(Point3D, ngon(O, 50, 80, 0, vertices=true))

        for (n, d) in enumerate((d1, d2, d3))
            randomhue()
            moveby!(d, Point3D(100cos(2π/3 * n), 100sin(2π/3 * n), 0))
            pin(d, gfunction = (p3, p2) -> poly(p2, close=true, :fill))
        end
        axes3D()
    end 600 400 "_assets/images/depth/disks.svg"
end

disks()
And wireframe spheres can be made in a similar way.
disk(r) = convert.(Point3D, ngon(O, r, 80, 0, vertices=true))

function sphere()
    sethue("red")
    d = disk(100)
    rotateby!(d, 0, π/2, 0)
    for n in 1:50
        pin(rotateby!(d, 0, 0, 2π/50))
    end
    sethue("blue")
    d = disk(100)
    for n in 1:50
        pin(rotateby!(d, 0, 2π/50, 0))
    end
end

function spheres()
    @svg begin
        setline(0.5)
        setlinejoin("bevel")

        tiles = Tiler(600, 300, 1, 2)

        @layer begin
            translate(first.(tiles)[1])
            eyepoint(200, 200, 200)
            axes3D(150)
            sphere()
        end

        @layer begin
            translate(first.(tiles)[2])
            eyepoint(0.1, 0, 200)
            axes3D(150)
            sphere()
        end
    end 700 400 "_assets/images/depth/spheres.svg"
end

spheres()
There are also a few functions that move and rotate 3D points. For example, the rotateby!() function rotates a 3D polygon by specific angles. I haven't written one that rotates it to a specific orientation.
With these simple tools it's quite easy to make things move in space and time.
disk(r) = convert.(Point3D, ngon(O, r, 80, 0, vertices=true))

drawpoly(p3, p2) = poly(p2, close=true, :stroke)

function frame(scene, framenumber)
    helloworld()
    axes3D()
    background("grey5")
    setline(15)
    step = 2π/scene.framerange.stop
    d1, d2, d3 = scene.opts
    sethue(Luxor.julia_red)
    pin(rotateby!(d1, step, 0, 0), gfunction = drawpoly)
    sethue(Luxor.julia_purple)
    pin(rotateby!(d2, 0, step, 0), gfunction = drawpoly)
    sethue(Luxor.julia_green)
    pin(rotateby!(d3, step, step, step), gfunction = drawpoly)
end

function makemovie()
    d1 = disk(150)
    d2 = disk(100)
    d3 = disk(50)

    amovie = Movie(400, 400, "a movie")
    animate(amovie, [Scene(amovie, frame, 1:100, optarg=(d1, d2, d3))],
        framerate=25,
        creategif=true,
        pathname="_assets/images/depth/amovie.gif")
end

makemovie()
The main problem with this animation is that the three rings don't interact in three dimensions - they're completely independent of each other.
For there to be real depth in an image, the depths of each point have to compared. That's a bit more work - you have to collect all the lines and then work out how they interact with each other. The code is a bit too long for this post, but the results are OK, particularly if we gradually change the colours too:

And because it's all parameterized, there are plenty of interesting variations to explore:

This one looks a bit familiar:

Back to the beginning
Going back to where I started: I think I'm imagining the animation to be like three cars in a damaged ferris wheel (think of the London Eye after it was vandalized during the famous Brexit riots of 2021...).
Here's an animation to show what I mean. It's possible to make two 3D views, one for each pane, with different viewing parameters for each one. The manual for Thebes.jl has a little more information about 3D views.
function frame(scene, framenumber)
    helloworld()
    background("grey20")
    setline(5)

    # create two panes for the two views
    panes = Tiler(800, 400, 1, 2)
    r = scene.easingfunction(framenumber, 0, 1, scene.framerange.stop)
    julia_colors = [Luxor.julia_red, Luxor.julia_purple, Luxor.julia_green]

    # Say there are L cars in a ferris wheel
    L = 16

    # make the first view, a standard perspective view
    @layer begin
        translate(first.(panes)[1])
        helloworld()
        perspective(500)
        eyepoint(250, 250, 250)
        axes3D()
        circuit = [Point3D(150cos(θ), 150sin(θ), 0) for θ in range(0, 2π, length=L)]
        rotateby!(circuit, -π/2, r * 2π, 0)
        disks = []
        for (n, i) in enumerate(circuit[5:7]) # just cars 5, 6, and 7
            d1 = convert.(Point3D, ngon(O, 50, 30, 0, vertices=true))
            moveby!(d1, i)
            push!(disks, (d1, n))
        end
        # sort by depth
        sort!(disks, lt = (a, b) -> first(a)[1].z < first(b)[1].z)
        for disk in disks
            sethue(julia_colors[last(disk)])
            pin(first(disk), gfunction = (_, p2) -> poly(p2, :fill))
            sethue(1.2 .* julia_colors[last(disk)])
            pin(first(disk), gfunction = (_, p2) -> poly(p2, close=true, :stroke))
        end
    end

    # make the second view, from the top
    @layer begin
        translate(first.(panes)[2])
        helloworld()
        perspective(0)
        eyepoint(5, -0.1, 200)
        axes3D()
        for disk in disks
            sethue(julia_colors[last(disk)])
            pin(first(disk), gfunction = (_, p2) -> poly(p2, :fill))
            sethue(1.2 .* julia_colors[last(disk)])
            pin(first(disk), gfunction = (_, p2) -> poly(p2, close=true, :stroke))
        end
    end
end

ferriswheel = Movie(800, 500, "ferris")
animate(ferriswheel,
    Scene(ferriswheel, frame, 1:100, easingfunction=easeinoutcubic),
    framerate=10,
    creategif=true,
    pathname="_assets/images/depth/ferriswheel.gif")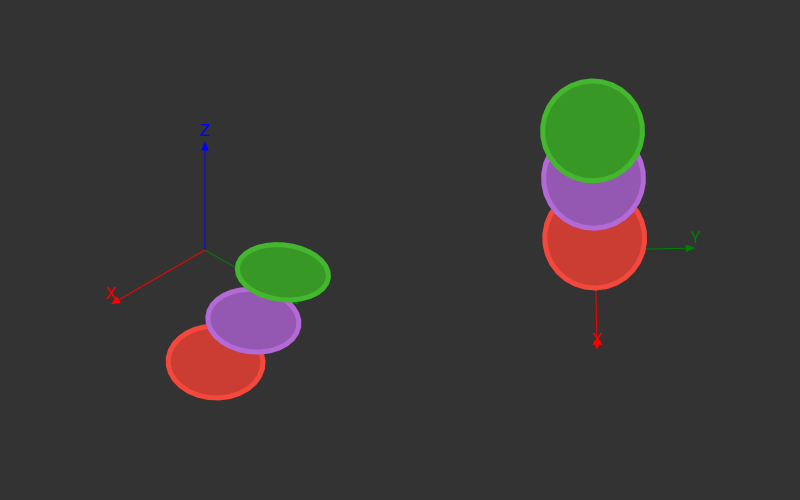
Plutonian
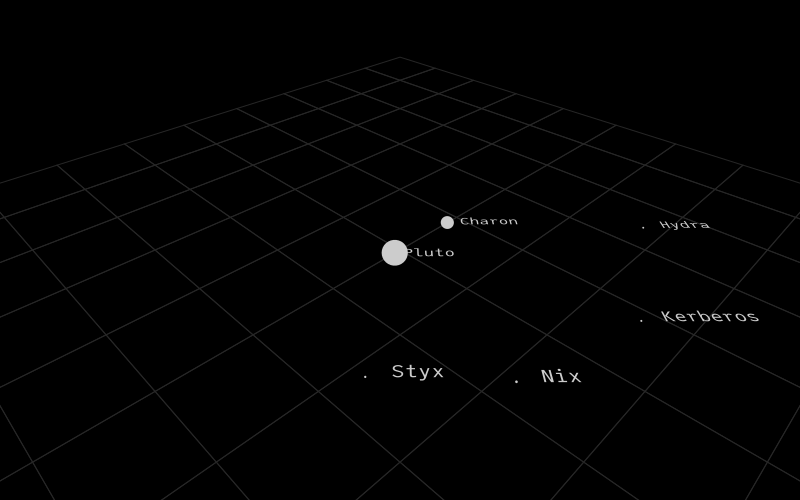
Talking of Pluto, Pluto (the planet) has five times as many moons as the Earth. I thought I'd create a simulation of the Plutonian system of moons. I haven't got the time or astronomical skill to do it for real, but it's relatively easy to fake a quick animation using the orbital details listed on wikipedia.
I've cut a few corners here - I just made up some starting positions, for example, and rounded some values, and this little animation is the result.
You can just make out the barycentric orbit of Pluto and Charon - they're both orbiting around a point that lies above the surface of Pluto.
function drawgrid()
    @layer begin
        sethue("grey15")
        setline(1)
        k = 100
        [pin([Point3D(x,     y,     0),
              Point3D(x,     y + k, 0),
              Point3D(x + k, y + k, 0),
              Point3D(x + k, y,     0)]) for x in -500:k:500, y in -500:k:500]
        end
end

plutoniansystem = [
    (name = "Pluto",
        diameter = 2376, mass = 1305,
        radius = 2035, period =  6.38723, init = 0),
    (name = "Charon",
        diameter = 1212, mass = 158,
        radius = 17536, period =  6.38723, init = 0.5),
    (name = "Styx",
        diameter = (16 + 9 + 8)/3, mass = 0.00075,
        radius = 42656, period = 20.16155, init = .1),
    (name = "Nix",
        diameter = (49.8 + 33 + 31)/3, mass = 0.005,
        radius = 48694, period = 24.85, init = .2),
    (name = "Kerberos",
        diameter = (19 + 10 + 9)/3, mass = 0.0016,
        radius = 57783, period = 32.16756, init = .3),
    (name = "Hydra",
        diameter = (50.9 + 36.1 + 30.9)/3, mass = 0.005,
        radius = 64738, period = 38.20177, init = .4)]

function frame(scene, framenumber)
    orbits = scene.opts
    background("black")
    eased_n = scene.easingfunction(framenumber, 0, 1, scene.framerange.stop)
    sethue("grey80")
    fontsize(20)
    fontface("JuliaMono")
    perspective(600)
    eyepoint(400, 400, 400)
    drawgrid()
    for (n, e) in enumerate(plutoniansystem)
        body = convert.(Point3D, ngon(O, rescale(e.diameter, 11, 2376, 1, 15), 30, 0,
            vertices = true))
        moveby!(body, orbits[n][mod1(framenumber, end)])
        rotateby!(body, midpoint(body[1], body[15]), -π/4, 0, -π/4)
        pin(body, gfunction = (p3, p2) -> begin
            poly(p2, :fill)
            text3D("  " * e.name, p3[1], rotation=(0, 0, deg2rad(135)))
        end)
    end
end

function drawplutonian()
    orbits = Array{Point3D, 1}[]
    for e in plutoniansystem
        scaledradius = rescale(e.radius, 2035, 64738, 10, 300)
        scaledperiod = convert(Int, floor(e.period * 100))
        orbit = [Point3D(scaledradius * cos(ϕ + (2π * e.init)), scaledradius * sin(ϕ + (2π * e.init)), 0) for ϕ in range(0, 2π, length = scaledperiod)]
        push!(orbits, orbit)
    end
    plutonian = Movie(800, 500, "plutonian system")
    animate(plutonian, Scene(plutonian, frame, 1:638, optarg = orbits),
        framerate = 50,
        creategif = true,
        pathname  = "_assets/images/depth/plutonian.gif")
end

drawplutonian()
Of course I'm very tempted to give it some colours - but in reality I think it's all pretty bleak out there in deep space so I'd better not.
[2020-09-22]

This page was generated using Literate.jl.